


Creating a new Text Template and Job Scheduler Event for Parking Lot Reminder
If your office has created a special text to communicate with patients when they arrive for their appointment, follow these simple instructions. With the update, KSB downloaded a new text message template, called KSB Parking Lot Reminder.
KSB Parking Lot Reminder Text Message
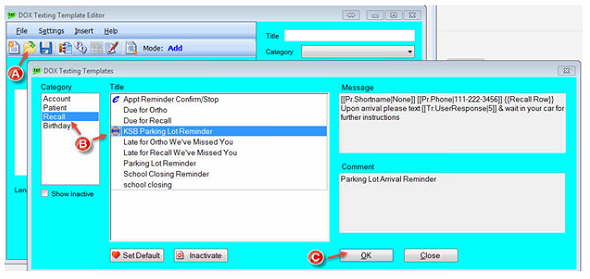
- To view and/or edit the texting template provided by KSB, go to an Unused Workspace and select the menu Write|Text Message.
- Click the Open Texting Message icon (Figure A).
- In the column called Category, click Recall and then KSB Parking Lot Reminder in the column called Title (Figure B).
- Then click OK (Figure C).
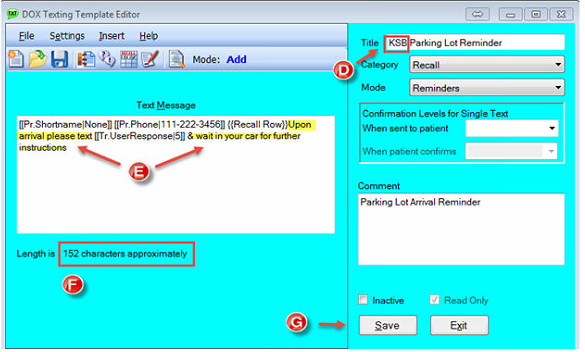
To use this template, first remove “KSB” from the title of the Parking Lot Reminder text message, as shown in Figure D.
To customize the text message to meet your specific needs, simply edit any of the words in the yellow highlights (Figure E). Do not remove the brackets around Pr.Shortname, Pr. Phone, Recall Row or Tr.User Response[5].
The texting editor includes a character counter (Figure F) to help you keep the message to 160 characters or less. Note: If the message is more than 160 characters, the patient will receive two texts.
Once all edits have been made, click Save and then Exit (Figure G).
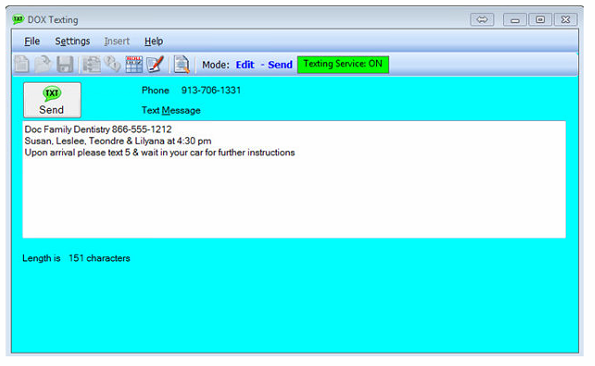
To ensure the text message will display the practice, appointment(s) and message correctly, go to a patient in TPL who has an appointment later today or go to a patient in tomorrow’s call list, and click Write|Text Message. Highlight the text message called “Parking Lot Reminder”, click SEND and check a phone number (the message will not actually send YET – we would have to click the SEND button again). The message should display similar to the one shown. Click the X in the upper right corner to close the message without sending it.
Creating the Text Message in Job Scheduler
We recommend that offices send this text message 15 or 30 minutes prior to the appointment. Most offices have selected to run the job 30 minutes before the appointment time.
- Go to Reports|Job Scheduler.
- Click ADD
- Select Recall in the second column and then Scheduled Reminders in the third column. Click NEXT.
Step 1 of 3
- Fill the Report Prompts as recommended in the following screen:
- Date Settings:
- Enter dates for appointment search: TODAY
- Enter appointment time: select either 15 minutes from now or 30 minutes from now (See Figure A)
- Date Settings:
-
- Text Settings:
-
-
- Complete the prompts exactly as they show in Figure B of the following screen; however, “Select text template to use:” may include another text template name if you chose to name the template differently in the previous instructions.
- Since confirmation texts have already been sent for these patients, and we do not want these 30 minute reminder texts to override the original confirmation levels, you should make the SENDING and CONFIRMING confirmation levels blank, as shown in Figure C.
- Note: If you ever need to re-edit the job scheduler prompts, please make sure these confirmation levels are set to blank.
-
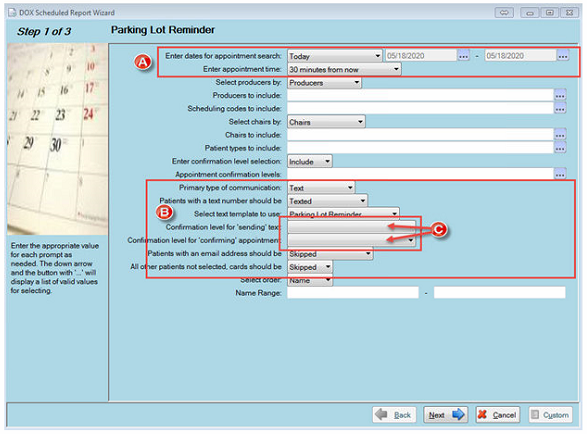
Click NEXT to continue.
Step 2 of 3
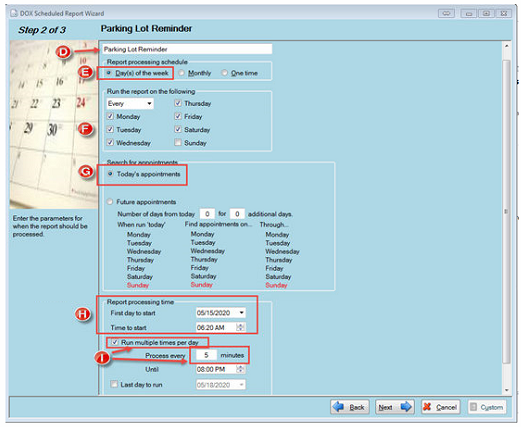
- Enter an appropriate name for the job, such as Parking Lot Reminder (Figure D).
- The report will run daily, so click Day(s) of the Week (Figure E).
- Then check the days your office is open during the week (Figure F). If you are currently working extra days of the week due to COVID, make sure you include them. It will not hurt to have too many days selected.
- In the Search for Appointments section, select Today’s Appointments (Figure G).
- In the Report Processing Time section, set the First Date to Start as tomorrow (or whatever day you are planning to begin sending these 30 minute reminder texts). In addition, make sure that your Time to Start is at least 30 minutes (15 minutes if you chose 15 minute reminders) before your first appointment of the day (Figure H).
- Make sure that Run multiple times per day is checked and set Process every time to 5 minutes, as shown in Figure I.
- Last Day to Run remains blank.
Click NEXT to continue.
Step 3 of 3
In the last screen (Step 3 of 3), you do not need to fill out any prompts. Just click FINISH. The system will then pop up a question as shown below. Click YES.
