


Adding, Editing, Deleting and Inserting Reply Responses
When a patient texts 5 as instructed in Parking Lot Reminder, the green text icon in TPL will change to RED, and “A” for Arrived will appear.
The staff can click the RED text icon to view the message and then click REPLY to send a response to the parent/patient in the car. The user can type a message, or they can take advantage of our new Reply Message feature. By clicking the Pen/Paper icon called Reply Messages (Figure A), the user can view common reply messages, highlight one, and then click SELECT (Figure B) to insert into the text message.
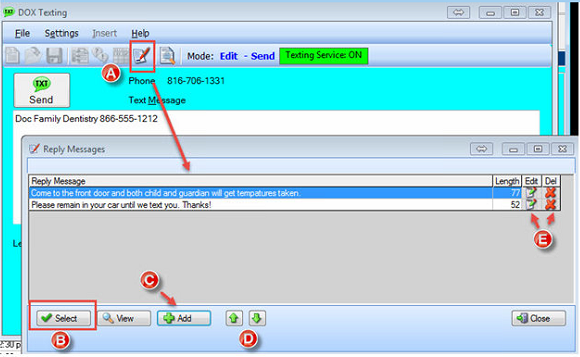
With the update, we provide two pre-set Reply Messages. To create a new one, simply click ADD (Figure C), type in the message, and click OK. The new message will display at the bottom of the list. If this new message will be one of the primary responses from your team, you can move the message to the top of the list by clicking the UP ARROW (Figure D). To move a message down in the list, you simply highlight a message and click the DOWN ARROW.
The user can also edit an existing reply message by highlighting the line of text and clicking EDIT (Figure E). Likewise, a user can delete a message by highlighting the line and clicking DELETE. Like most features in DOX, the system prompts a warning to make sure that you want to delete the selected message. Select Yes to confirm.