


Activating A2 Setting in TPL
When using the new TPL Texting feature, practices are reporting that as the parent/patient arrives in the parking lot and texts 5 (which changes the TPL to A for Arrived), they normally text a reply that communicates one of two responses:
- Office is ready, and they send a reply similar to “Please come to the front door and we will take temperatures of both the guardian and patient”.
- Office is not ready, and they text a response similar to “Please remain in your car, and we will text you when we are ready”.
Regardless of how the practice responds to the family in the parking lot, the RED text icon will return to GREEN. The primary intent of the new DOX Text Column is to allow offices to easily text families directly from TPL, rather than texting through the Dashboard. A RED text icon should indicate to the office staff that the parent/patient has sent a new message which has not been read yet; while the GREEN icon indicates that there is no new message from the parent/patient, meaning that all messages have been read.
However, practices have reported that when they send a text to the family in the parking lot indicating that the office is not ready for them yet, the staff sometimes loses track of those who are still waiting in their cars. We suggest that practices consider using the A2 location status to track these patients who are waiting. In essence, when a staff member replies by text for the family to wait for further instructions, then that staff member also presses A again in TPL to change the status from A to A2, as shown in the following screen.
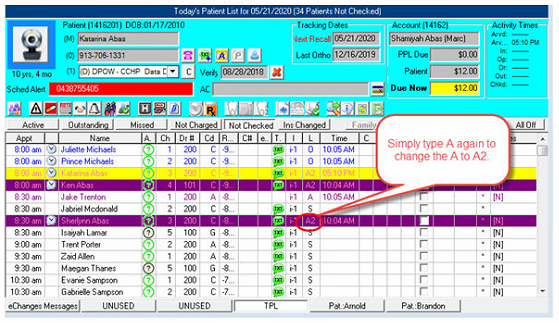
Note: The color settings of A2 in this TPL are those indicated in Figure B below.
Enabling A2 option in TPL
- Go to an Unused Workspace, and select Setup|TPL|Settings.
- In the tab called Colors(1), check the box by Arrived 2.
- For color settings, there are two common selections chosen by offices
- Some practices prefer to have the colors of A2 display exactly the same as A (Arrived) as shown in Figure A. The office staff primarily focuses on reading the status in the “L” column to determine the location of the patient.
- Other practices prefer to view a line of color versus looking for the A2. For these offices, they may want to “reverse” the colors of A, drawing more attention to the people who are still waiting and assigned A2, as shown by the settings in Figure B.
- Once A2 has been enabled and your color selections have been made, click OK to save the settings and close the screen.

Tips for changing colors:
- To change a color setting, simply click the … next to the color.
- As you will notice most of the Background Colors are set to white, allowing the dominant color to be set as the Font Color. If the Background Color is the darker color, as in Figure B, then the Font Color needs to be a lighter color that not only displays nicely on the background color selected but also when a YELLOW highlight is placed on that line in TPL. An office should never use WHITE as the Font Color because it is unreadable when the YELLOW cursor is placed on it. For that reason, we have selected a PINK as the FONT color to ensure that the PINK lettering is readable in both situations (see the TPL above).
- To test your color selections, click OK to save. Then go to TPL and set a patient to the status of A2. Make sure that you also place the YELLOW highlight on it as well. If you do not like your color selection, return to Setup|TPL|Settings, change the color, and return to TPL. To make the TPL reflect your changes, click the REFRESH button in the upper right area of the screen.